에러와 해결 방법
createUserWithEmailAndPassword & signInWithEmailAndPassword 오류
onSubmit 함수 중
createUserWithEmailAndPassword와 signInWithEmailAndPassword 함수에 다음과 같이 코드를 작성하였더니 오류가 생겼다.
코드
import {
  createUserWithEmailAndPassword,
  signInWithEmailAndPassword,
} from 'firebase/auth';
import { authService } from 'fbase';

data = await createUserWithEmailAndPassword(
          authService,
          email,
          password
        );
에러
FirebaseError: Firebase: Error (auth/user-not-found).
    at createErrorInternal (assert.ts:122:1)
    at _fail (assert.ts:65:1)
    at _performFetchWithErrorHandling (index.ts:173:1)
    at async _performSignInRequest (index.ts:191:1)
    at async _signInWithCredential (credential.ts:37:1)
    at async onSubmit (Auth.js:33:1)
해결방법
user-not-found 에러는 제공된 식별자에 해당하는 기존 사용자 레코드가 없다는 뜻이다.
fbase.js 에서 import한 authService 말고, 현재 파일에서 getAuth 메서드를 import 하여 auth를 가져와야 한다.
변경된 코드
import {
  getAuth,
  createUserWithEmailAndPassword,
  signInWithEmailAndPassword,
} from 'firebase/auth';

function Auth() {
  const auth = getAuth();
  const [email, setEmail] = useState('');
  const [password, setPassword] = useState('');
  const [newAccount, setNewAccount] = useState(true);

  const onSubmit = async (event) => {
    event.preventDefault();
    try {
      let data;
      if (newAccount) {
        data = await createUserWithEmailAndPassword(auth, email, password);
      } else {
        data = await signInWithEmailAndPassword(auth, email, password);
      }
      console.log(data);
    } catch (error) {
      console.log(error);
    }
  };
}
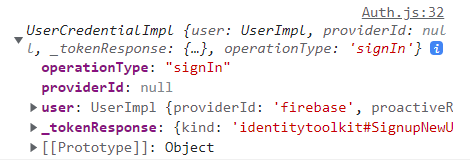
콘솔에 data가 잘 찍히는 것을 볼 수 있다.
+) 이전에 사용했던 이메일로 다시 회원가입을 하면 auth/email-already-in-use 에러가 발생한다.
이럴 때는 새로운 이메일로 회원가입 테스트를 하거나 firebase 데이터베이스에서 사용자를 삭제하면 해결할 수 있다.
( 처음에 회원가입을 하고 나서 newAccount 값을 false로 변경해야 하는데 setNewAccount 함수를 아직 코드에 넣지 않아서 회원가입이 두 번 발생하는 것이니 크게 신경쓰지 않아도 된다)
firebase instance import 오류
fbase.js 에 firebase instance를 import 하면 오류가 발생한다.
코드
import firebase, { initializeApp } from 'firebase/app';
import { getAuth } from 'firebase/auth';

const firebaseConfig = {
  apiKey: process.env.REACT_APP_API_KEY,
  authDomain: process.env.REACT_APP_AUTH_DOMAIN,
  projectId: process.env.REACT_APP_PROJECT_ID,
  storageBucket: process.env.REACT_APP_STORAGE_BUCKET,
  messagingSenderId: process.env.REACT_APP_MESSAGIN_ID,
  appId: process.env.REACT_APP_APP_ID,
};
initializeApp(firebaseConfig);

export const firebaseInstance = firebase;

export const authService = getAuth();
에러 메시지
ERROR in ./src/fbase.js 14:32-40
export 'default' (imported as 'firebase') was not found in 'firebase/app'
(possible exports: FirebaseError, SDK_VERSION, _DEFAULT_ENTRY_NAME, _addComponent,
_addOrOverwriteComponent, _apps, _clearComponents, _components, _getProvider,
_registerComponent, _removeServiceInstance, deleteApp, getApp, getApps, initializeApp,
onLog, registerVersion, setLogLevel)
오류 메시지를 살펴보면
fbase.js 에서 firebase 자체를 import 할 수 없고, firebase 인스턴스에 속해있는 메서드만 import가 가능한 것 같다.
해결 방법
firebase instance를 getAuth() 함수로 받아와서 export 했더니 오류가 해결됐다.
이렇게 되면 firebaseInstance랑 authService랑 export 하는 값이 같아지는데...🤔 굳이 두 번 export 해야하나? 라는 생각이 들지만, 코드의 이해를 위해 그냥 그대로 사용했다.
import { initializeApp } from 'firebase/app';
import { getAuth } from 'firebase/auth';

const firebaseConfig = {
  apiKey: process.env.REACT_APP_API_KEY,
  authDomain: process.env.REACT_APP_AUTH_DOMAIN,
  projectId: process.env.REACT_APP_PROJECT_ID,
  storageBucket: process.env.REACT_APP_STORAGE_BUCKET,
  messagingSenderId: process.env.REACT_APP_MESSAGIN_ID,
  appId: process.env.REACT_APP_APP_ID,
};
initializeApp(firebaseConfig);

export const firebaseInstance = getAuth();
export const authService = getAuth();
GoogleAuthProvider, signInWithPopup 함수 오류
GoogleAuthProvider 함수를 사용했을 때 에러가 발생했다.
(아래 GithubAuthProvider 함수도 마찬가지)
코드
import { authService, firebaseInstance } from 'fbase';

const onSocialClick = async (event) => {
    const {
      target: { name },
    } = event;
    let provider;
    if (name === 'google') {
      provider = new firebaseInstance.auth.GoogleAuthProvider();
    } else if (name === 'github') {
      provider = new firebaseInstance.auth.GithAuthProvider();
    }
    const data = await authService.signInWithPopup(provider);
  };
에러 메시지
Auth.js:49 Uncaught (in promise) TypeError:
Cannot read properties of undefined (reading 'GoogleAuthProvider')
에러 메시지를 살펴보면 GoogleAuthProvider 함수를 읽지 못하는 것을 확인할 수 있다.
해결 방법
해당 함수를 사용할 파일에 GoogleAuthProvider와 signInwithPopup를 직접 import 해주어야 한다.
import {
  signInWithPopup,
  GoogleAuthProvider,
} from "firebase/auth";

provider = new GoogleAuthProvider();
const data = await signInWithPopup(authService, provider);
이전 버전과 최신 버전을 살펴보면 메서드 사용방법이 다른 것을 알 수 있다.
이전 버전: firebase instance 를 export 시켜서 firebase instance 기준으로 메서드 사용
최신 버전 : firebase 에서 사용할 메서드를 import로 받아와서 firebase instance(auth)를 메서드 인자로 사용
auth/account-exists-with-different-credential 오류
google로 로그인을 한 뒤, github로 로그인을 시도했더니 다음과 같은 에러가 발생했다.
Uncaught (in promise) FirebaseError:
Firebase: Error (auth/account-exists-with-different-credential).
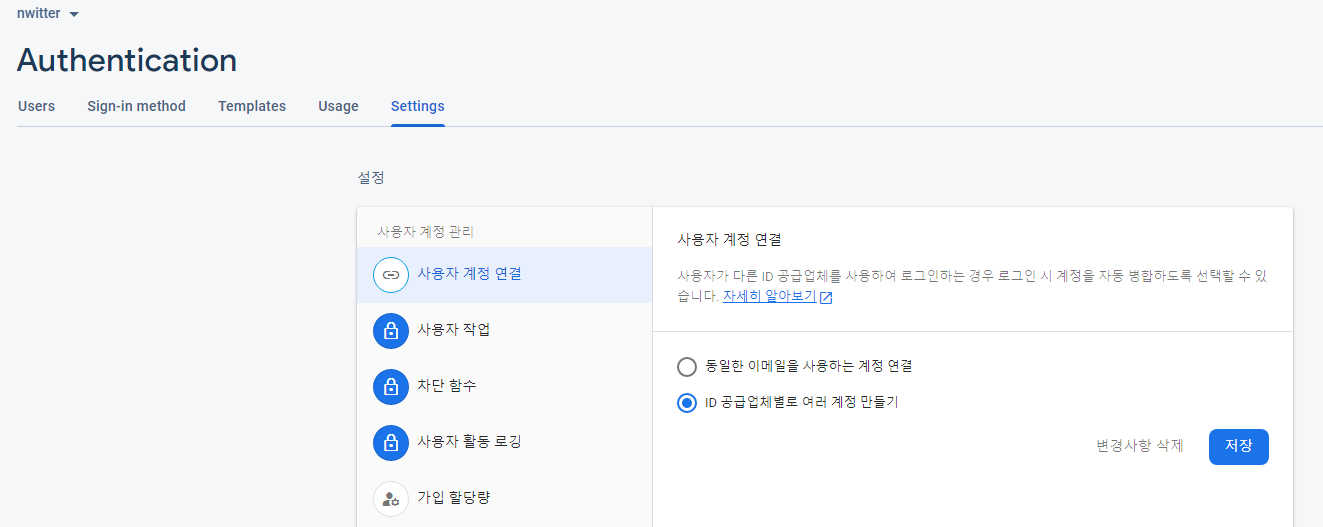
이미 로그인을 한 상태에서 다른 이메일로 가입하려고 하니 생긴 오류였다.
한 계정 당 여러 이메일을 연결할 수 있도록 설정을 바꾸면 에러를 해결할 수 있다.
firebase - console - 프로젝트에 들어가서 아래의 사진처럼 옵션을 변경하면 된다.

Redirect 오류
React Router v6부터는 useHistory와 redirect를 사용할 수 없다.
코드
import { Redirect } from 'react-router-dom';

<Routes>
	<Route>...</Route>
	<Redirect to="/error-page" />
</Routes>
오류 메시지
react-router-dom에서 Redirect를 읽어올 수 없다고 뜬다.
해결 방법
대신 useNavigate(hook) 나 Navigate(component)로 대체가 가능하다.
import { useNavigate } from "react-router-dom";

const Profile = () => {
    const navigate = useNavigate();
    const onLogOutClick = () => {
        authService.signOut();
        navigate("/");
    }
};
firestore import 오류
firebase instance에서 firestore 메서드를 가져오면, 메서드를 읽을 수 없다는 오류가 발생한다.
코드
import { initializeApp } from 'firebase/app';
import { getAuth } from 'firebase/auth';
import 'firebase/firestore';

const firebaseConfig = {
	...
};
initializeApp(firebaseConfig);

export const firebaseInstance = getAuth();
export const dbService = firebaseInstance.firestore();
해결 방법
firebase instance 대신 직접 getFirestore 메서드를 import 한다.
import { getFirestore } from 'firebase/firestore';

export const dbService = getFirestore();
firestore addDoc() 사용 방법
버전 차이 때문에 발생하는 오류에 지친 나...😂
이젠 최신 버전의 코드만 기록해보도록 하겠다.
위에서 dbService라는 firestore 인스턴스를 export 했다.
이 dbService를 가지고 firestore에 addDoc 하는 코드를 아래에 작성한다.
import { dbService } from 'fbase';
import { collection, addDoc } from 'firebase/firestore';
import React, { useState } from 'react';

function Home() {
  const [nweet, setNweet] = useState('');

  const onSubmit = async (event) => {
    event.preventDefault();
    await addDoc(collection(dbService, 'nweets'), {
      nweet,
      createdAt: Date.now(),
    });
    setNweet('');
  };
}
firestore getDoc() 사용 방법
querySnapshot 변수로 받아온 document들에 대해 foreach로 접근한다.
이 때 setNweets() 를 할 때 배열을 반환하는 함수(새로 작성한 트윗, 그 이전 것들)를 인자로 설정한다.
리액트는 set이 붙는 함수를 사용할 때, 이 함수의 인자로 함수를 전달하면 이전의 값(prev)에 접근할 수 있도록 해준다.
import { dbService } from 'fbase';
import { query, collection, addDoc, getDocs } from 'firebase/firestore';

function Home() {
  const [nweet, setNweet] = useState('');
  const [nweets, setNweets] = useState([]);

  const getNweets = async () => {
    const q = query(collection(dbService, 'nweets'));
    const querySnapshot = await getDocs(q);
    querySnapshot.forEach((doc) => {
      const nweetObj = {
        ...doc.data(),
        id: doc.id,
      };
      setNweets((prev) => [nweetObj, ...prev]);
    });
  };

  useEffect(() => {
    getNweets();
  }, []);
}
onSnapshot 메서드 사용하는 방법
onSnapshot을 사용하면 nweets collection의 데이터가 CRUD 될 때마다 함수를 실행할 수 있다.
getDocs를 사용하는 방법은 구식 방법이고, 그 대신에 onSnapshot을 사용할 수 있다.
getDocs : forEach 사용, re-render 발생 O
onSnapshot : map 사용, re-render 발생 X
➡ 성능적으로 onSnapshot 이 더 좋다.
+) 🤔 왜 성능이 더 좋을까?
Difference between get() and onSnapshot() in Cloud Firestore
I am reading some data from Firebase's Cloud Firestore but I've seen several ways to do it. The example I saw used the get and onSnapshot function like this: db.collection("cities").doc("SF") .
stackoverflow.com
📝 윗 글 요약
getDocs : firebase 데이터가 변경되면 변경 사항을 확인하기 위해 다시 호출해야 한다.
onSnapshot() : llistener. 데이터베이스에 무슨 일이 있을 때 이벤트를 받는다. 내가 설정한 콜백 함수 --여기서는 map 이겠죠?--로 초기 값이 설정이 되고, 내용이 변경될 때마다 snapshot을 실시간으로 업데이트 한다.
활용 코드
import { dbService } from 'fbase';
import { query, collection, addDoc, onSnapshot } from 'firebase/firestore';
import React, { useEffect, useState } from 'react';

function Home({ userObj }) {
  const [nweet, setNweet] = useState('');
  const [nweets, setNweets] = useState([]);

  const getNweets = async () => {
    const q = query(collection(dbService, 'nweets'));
    onSnapshot(q, (snapshot) => {
      // forEach보다 map을 사용하면 re-render 발생 감소
      const nweetArray = snapshot.docs.map((doc) => ({
        id: doc.id,
        ...doc.data(),
      }));
      setNweets(nweetArray);
    });
  };
  useEffect(() => {
    getNweets();
  }, []);
}
deleteDoc, updateDoc 사용 방법
import React from 'react';
import { dbService } from 'fbase';
import { doc, deleteDoc, updateDoc } from 'firebase/firestore';
import { useState } from 'react';

function Nweet({ nweetObj, isOwner }) {
  const [newNweet, setNewNweet] = useState(nweetObj.text);
  const NweetTextRef = doc(dbService, 'nweets', `${nweetObj.id}`);

  const onDeleteClick = async () => {
    const ok = window.confirm('Are you sure you want to delete this nweet?');
    if (ok) {
      await deleteDoc(NweetTextRef);
    }
  };

  const onSubmit = async (event) => {
    event.preventDefault();
    await updateDoc(NweetTextRef, {
      text: newNweet,
    });
  };

  const onChange = (event) => {
    const {
      target: { value },
    } = event;
    setNewNweet(value);
  };
}
onFileChange 함수 사용법
onFileChange 함수에서 주목해야 하는 점은 바로 onloaded listener 함수이다.
reader가 생성되고 파일 로딩이 끝났을 때(파일 읽어오기를 완료했을 때) onloaded event listener 함수가 실행된다.
그 다음에 reader.readAsDataURL을 실행한다.
⚠ 순서가 헷갈릴 수 있으니 주의하자!
const onFileChange = (event) => {
    const {
      target: { files },
    } = event;
    const theFile = files[0];
    const reader = new FileReader();
    reader.onloadend = (finishedEvent) => {
      console.log(finishedEvent);
    };
    reader.readAsDataURL(theFile);
  };
firebase Storage 사용법
강의에 집중하느라 블로그 포스팅을 적지 못했다...😂
코드 양이 상당히 많기 때문에 우선 nwitter가 끝나고 나면 다시 적을 예정이다.
firebase orderby() 정렬 오류
아래의 코드를 실행하게 되면 다음과 같은 에러가 발생한다.
import { authService, dbService } from 'fbase';
import { collection, getDocs, query, where, orderBy } from 'firebase/firestore';

const getMyNweets = async () => {
    const q = query(
      collection(dbService, 'nweets'),
      where('creatorId', '==', userObj.uid),
      orderBy('createdAt', 'desc')
    );
    const querySnapshot = await getDocs(q);
    querySnapshot.forEach((doc) => {
      console.log(doc.id, '=>', doc.data());
    });
  };
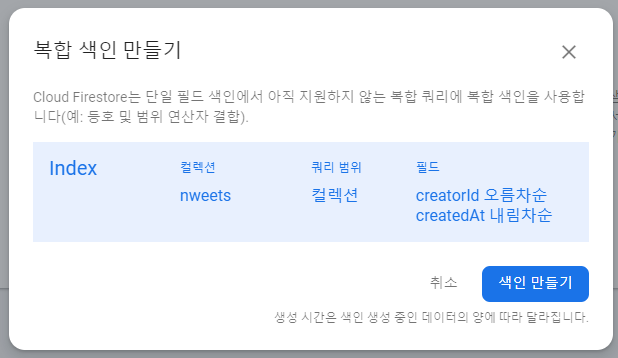
위의 에러는 '해당 쿼리에 index가 필요하다'고 알려주고 있다.
이것은 pre-made query를 만들어야 한다는 뜻이다. 우리가 이 쿼리를 사용할 거라고 데이터베이스에 알려줘야 한다.
그래야 데이터베이스가 쿼리를 만들 준비를 할 수 있기 때문이다.
에러에 적혀있는 링크를 타고 들어가면 복합 색인을 만들 수 있다.


복합 색인이 잘 만들어진 것을 확인할 수 있다.
이것이 쿼리를 실행할 수 있도록 생성하는 방법이다.
쿼리 필터링 할 때 참고한 코드
✅ 쿼리 필터링하기
[참고]
- 컬렉션에서 여러 문서 가져오기:
https://firebase.google.com/docs/firestore/query-data/get-data#get_multiple_documents_from_a_collection

- 데이터 정렬 및 제한:
https://firebase.google.com/docs/firestore/query-data/order-limit-data#order_and_limit_data

// v.9

import { authService, dbService } from "fbase";
import { collection, getDocs, query, where, orderBy } from "firebase/firestore";
import { useEffect } from "react";
//...

//1. 로그인한 유저 정보 prop으로 받기
const Profile = ({ userObj }) => {
//...

//2. 내 nweets 얻는 function 생성
const getMyNweets = async () => {
//3. 트윗 불러오기
//3-1. dbService의 컬렉션 중 "nweets" Docs에서 userObj의 uid와 동일한 creatorID를 가진
// 모든 문서를 내림차순으로 가져오는 쿼리(요청) 생성
const q = query(
collection(dbService, "nweets"),
where("creatorId", "==", userObj.uid),
orderBy("createdAt", "desc")
);

//3-2. getDocs()메서드로 쿼리 결과 값 가져오기
const querySnapshot = await getDocs(q);
querySnapshot.forEach((doc) => {
console.log(doc.id, "=>", doc.data());
});
};

//4. 내 nweets 얻는 function 호출
useEffect(() => {
getMyTweets();
}, []);

return (
<>
로그아웃
</>
);
};

export default Profile;
updateProfile 함수 사용법
import { updateProfile } from "@firebase/auth";

if (userObj.displayName !== newDisplayName) {
await updateProfile(userObj, { displayName: newDisplayName });
}
이메일로 가입해서 로그인을 하면 displayName이 null로 나와서 에러가 발생한다.
이때 Navigation.js에
function Navbar({ userObj}) {
if (userObj.displayName === null) {
const name = userObj.email.split('@')[0];
userObj.displayName = name;
}
를 추가하여 Email의 앞부분을 떼와서 displayName에 넣어줄 수 있다.
displayName을 수정했을 때 header에 적용되지 않는 오류
이 오류는 중요하니 잘 기록을 해둘 것...!
React에서는 state의 변화가 생겼을 때, 새 정보를 인식한 후 모든 요소들을 다시 렌더링 해준다.
지금 코드의 userObj를 따라가보면 App.js에 지정된 userObj가 제일 처음으로 적용된다.
uerObj 의 흐름
App -> AppRouter -> home / profile / navigation
🤔 userObj에 새로운 state를 적용하면 어떻게 될까?
➡ 전체에 변화를 줄 수 있다!
  const refreshUser = (user) => {
    setUserObj(authService.currentUser);
  };
위와 같이 setUserObj (useState Hook) 을 사용했지만, re-rendering이 되지 않았다.
🤯 state에 변화가 생겼는데 왜 re-rendering이 되지 않을까?
currentUser 전체를 console.log 해보면 엄청나게 거대한 정보를 갖고 있는 객체인 것을 확인할 수 있다.
이럴 때 React는 state가 변경이 되었는지 확인하는 것이 어렵다.
🙆♂️ 어떻게 하면 re-rendering이 되도록 할 수 있을까?
1. object의 크기를 줄여준다.
원래 크기만큼의 방대한 정보가 우리에게 필요없기 때문에, 필요한 정보를 제외한 나머지 정보를 제거한다.
// App.js의 모든 setUserObj를 아래처럼 바꾸기

setUserObj({
displayName: user.displayName,
uid: user.uid,
updateProfile: (args) => updateProfile(user, { displayName: user.displayName }),
});

// Profile.js에서는 이렇게 바꾸기

if(userObj.displayName !== newDisplayName){
await updateProfile(authService.currentUser, { displayName: newDisplayName });
refreshUser();
}
프로필 아이디 수정 즉시 바뀌게 된다!
updateProfile: (args) => updateProfile(user, { displayName: user.displayName })위의 부분은 실제 updateProfile 함수를 가져오기 위한 중간 함수이다.
💡 더 작은 객체를 수정함으로써 React가 state 변경되었는지 판단할 수 있는 것이다!
2. user 객체 전체를 다 가져온 후 refreshUser에서 객체가 수정된 것을 알려주기
 const refreshUser = () => {
    const user = authService.currentUser;
    setUserObj(Object.assign({}, user));
  };
임의로 빈 객체에서 user 객체의 사본이 새 object 형태로 생성이 된다.
이 때문에 React가 새로운 object가 생성된 것을 감지하여 re-rendering 을 발생한다.
❌ 하지만 2번의 방법은 문제가 많기 때문에 1번의 방법을 추천한다.
후기
이전에 android app을 만들 때 firebase를 쉽게 연동했던 경험이 있어 빠르게 끝날 줄 알았던 Nwitter 클론 코딩!
하지만 firebase 를 최신 버전으로 사용하려니 기존 코드와 다른 부분이 너무 많아 구현하는 데에 시간 소모가 2~3배 들었다..😂
실제 개발에서는 안정성을 위해 최신 버전보다 구 버전을 사용한다는데 그 이유를 몸소 체험할 수 있었다.
그래도 오류가 많이 나는 만큼 공부도 많이 할 수 있었다...😀!!!
+) edit profile 부분에서 profile photo edit 하는 기능도 추가해보기
+) finishing up 부분 듣기
'My little 프로젝트' 카테고리의 다른 글
| [옥소폴리틱스] 옥소폴리틱스 Home page 클론 프로젝트 회고 (1) | 2022.08.11 |
|---|

Comment